Notes are private, which is why I don't like using tools like OneNote. While powerful and widely used, the problem is that to effectively sync notes between devices, the only viable way is to use OneDrive, or even SharePoint hosted by Microsoft 365.
The alternative I found and implemented is to store the notes on my Nextcloud, and use the Joplin app for note entry. Below is how to set up the sync.
First, log in to your Nextcloud web interface and create the folder that will contain all your notes. In our example, I called it " Joplin."
Next, we need to get the WebDAV path to this folder. In Nextcloud, we can get this by putting together 2 parts:
- Part One: In the web interface's file explorer, click on "File Settings" in the bottom left corner, and in the "WebDAV" section, note the URL displayed. It should be as follows:
https://NextcloudURL/remote.php/dav/files/USERNAME- Second part: Note the path to your created folder " Joplin ". For example, if you put it at the root of your Netcloud, the second part will be only " Joplin ". If on the other hand this folder is in a subfolder named "Notes", the second part will be " Notes/Joplin "
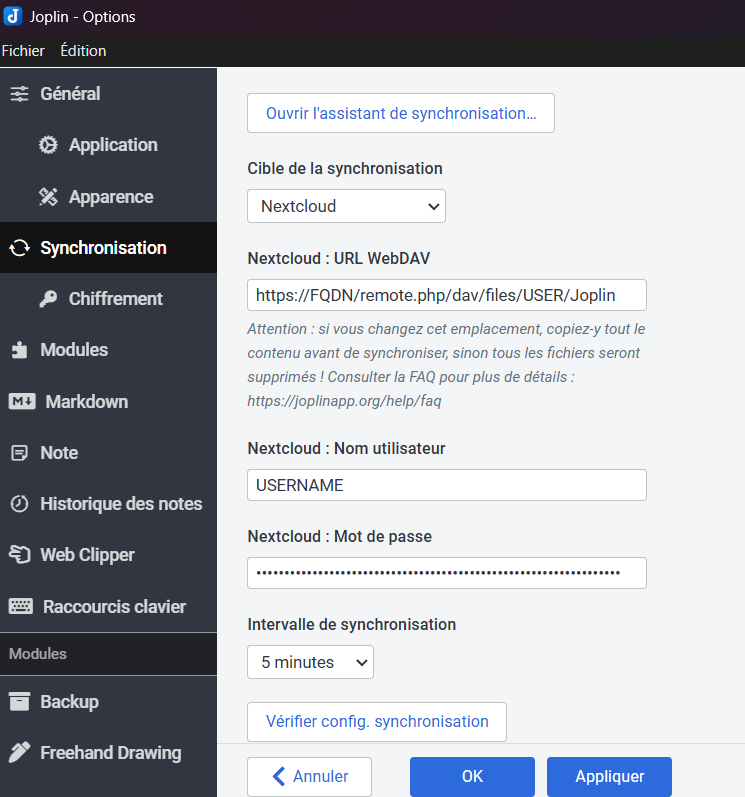
Now that we have the full path, we can open Joplin, and go to the settings accessible via " Tools > Options ", and go to the " Synchronization " section.
In the " Synchronization Target " list, choose " Nextcloud ", and enter in the " Nextcloud: WebDAV URL " field the two parts of the path obtained previously, and in " Nextcloud: Username " and " Nextcloud: Password " your Nextcloud login and password.
Once done, you can apply the configuration by clicking on the " Apply " button and closing the settings.
In case this is the first synchronization and Joplin has just been installed, you can click on the " Delete local data and re-download from the synchronization target " button.
On the other hand, if you have data in your Joplin, and the folder on Nextcloud is empty, click on " Send local data to the synchronization target again "
And there you have it, you are now synchronized, all that's left is to repeat these operations on all the computers and mobile devices you want to synchronize.